


The Weagree Wizard fully enables the use of tables in documents for a wide range of purposes, such as designing a clean signatory block, creating an elaborate term sheet, or producing complex forms. Basic table designs are standardised via the Word templates used for document generation, but can be customised in numerous respects. Questions can be incorporated into tables or be used, vice versa, to dynamically assemble tables.
TABLE OF CONTENTS
A. Word versus Weagree
B. Simple tables
C. Complex tables – composites
D. Complex tables – embedded
E. Table customisation
A. WORD VERSUS WEAGREE
When working with tables in the Weagree Wizard, it is important to understand that tables in Template Creation Tool (TCT) are fundamentally different from those in Microsoft Word (or any other regular desktop text editor). Because the TCT is a web tool, it handles tables via HTML – web code. This means that tables are not constructed in the same way as in Word, although they are ultimately converted into actual Word tables upon document generation. When pasting anything copied from Word into the TCT, its text editor attempts to convert it to HTML while filtering out unsupported as well as potential harmful code.
Consequently, trying to directly copy-and-paste a Word table into the TCT will rarely if ever turn out correctly. The automated import should at least be able to produce a technically correct table, but in most cases it will only partially resemble the original. To accurately reproduce both the appearance and contents of any table in your model contract, therefore, you should manually create or edit it in the TCT.
B. SIMPLE TABLES
A single table with the same number of columns for each row (a ‘simple’ table) can be inserted anywhere. It can be immediately preceded or followed by text, without the need for line or paragraph breaks unless additional white space is desired. Usually, however, it is best to add a table to an otherwise empty building block, contract clause or answer option.
1. Select a non-numbered style. Use Level 2 – no numbering, Level 3 – no numbering, etc. if any indentation should apply.
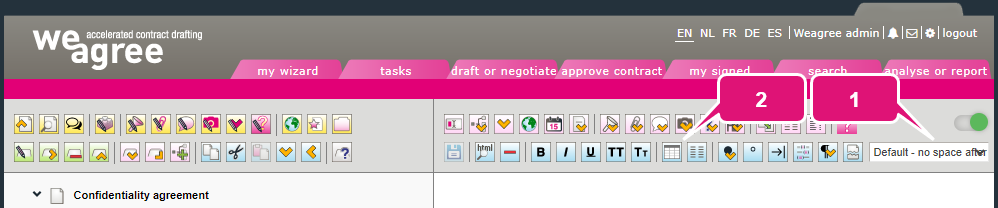
2. Click Insert a table. A pop-up will appear.
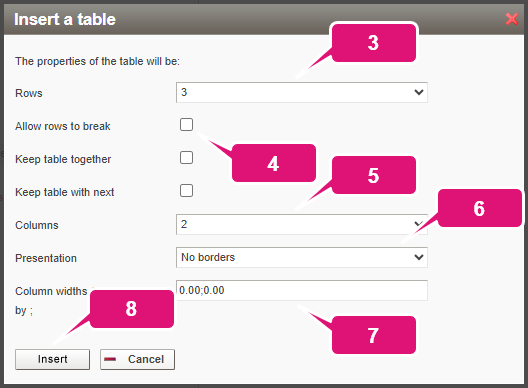
3. Select the number of rows.
4. Optionally, enable Allow rows to break. If there’s not enough room left for the entirety of the last row on the page, it will be split in two: the remainder of that row will appear at the top of the next page. When disabled, the row will instead be pushed entirely to the top of the next page. Enabling this will therefore use all of the available space on a page.
5. Select the number of columns.
Note: if more than 7 rows or columns are needed, you can add these with the HTML editor. For more information, click here.
6. Select the appearance of the table:
a. No borders: this simply results in an invisible grid with uniform formatting, useful for signatory blocks or anything else that just requires aligning text in columns.
b. Outside borders & header: the header row will have special formatting (usually: bold text and a background colour). Be aware that there will be no visible vertical lines between columns.
c. One box (outside borders): appearing as a single rectangular box, this is best used for single-column tables that need to draw the reader’s eye.
d. Borders outside & inside: a ‘regular’ table design in which every cell is fully bordered and the header row has special formatting. Useful for most scenarios.
Note: this choice will not affect the appearance of a table in the TCT. It will be applied in the generated document.
7. Optionally, specify each column’s width in centimetres. Keep in mind that the total usable page width is usually approximately 16 cm. When all columns are set to “0.00”, they will default to equal widths.
Note: the equal-width rule only applies to the generated document. In the TCT and the questionnaire’s WYSIWYG view (‘underwater screen’), column widths may vary if not specified. It is therefore often a good idea to set a width for each column anyway.
8. Click Insert.
9. Click Save the changes made (or press Ctrl+S).
Note: when inserting text into a table cell, use the Enter key for both line and paragraph breaks instead of the [EOL] tag.
C. COMPLEX TABLES – COMPOSITES
A simple table may not meet your needs, for example simply because some of the table’s rows are optional. Another possibility is that the number of columns per row must vary. It could also be that the table should be uniform, but might be inserted so low on a page that it will be split after the header row. The TCT offers several ways of handling such cases.
The main rule is that adjoining tables – i.e. tables without any text, line or paragraph breaks in-between – with the same appearance as selected under step 6 above will be merged into a single table. Three such successive tables with the Borders outside & inside appearance, for example, would turn into one composite table with one specially formatted header row. This even works across contract clauses, provided that they have the same styling.
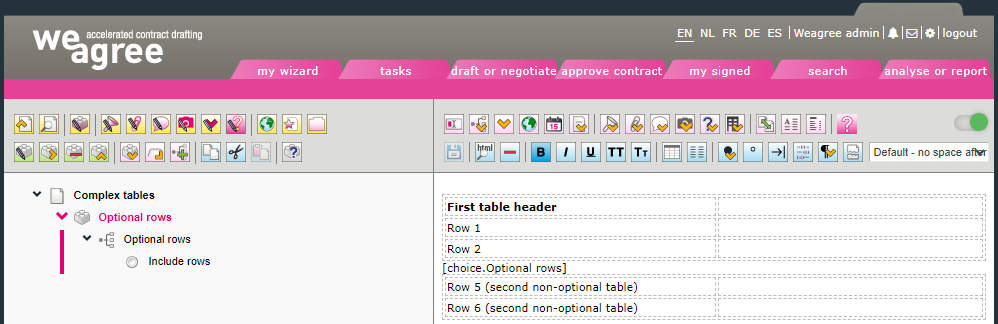
1. To create a table with optional rows:
a. For each set of non-optional rows, create a table as described in section B above. Insert all the tables into the same template component (i.e. building block, contract clause or answer option), in their intended order of appearance.
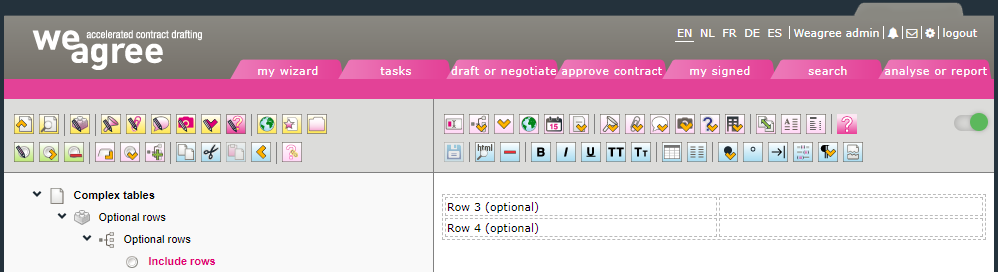
b. Create choice questions and fill their answer options with tables constituting the optional rows (it does not matter if this results in single-row tables). Ensure the tables have the same width and appearance as the non-optional tables created at step a.
c. Insert the choice question tags between the non-optional tables created at step a.
Note 1: see the Q&A creation – basics section of this Knowledge base for instructions on the creation of choice questions.
Note 2: alternatively, you could use separate contract clauses with clause inclusions where appropriate to achieve the same effect.
The following screenshots illustrate this type of composite table:
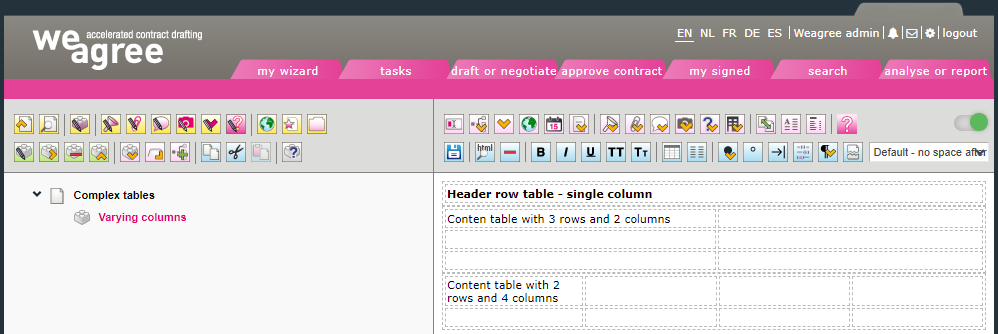
2. To create a table with varying numbers of columns, create a separate table for each set of rows with the same number of columns. You may insert all the tables into the same template component if you wish. Ensure they all have the same total width and appearance.
The following screenshot illustrates this type of composite table:
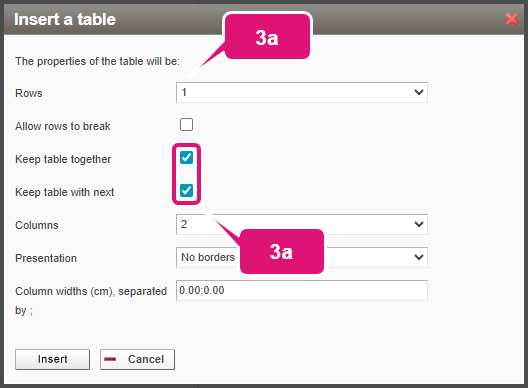
3. To always keep the header row of a composite table as described above together with any following row:
a. Create the header row as its own table and enable Keep table together and Keep table with next.
b. Create the next table(s) as described in section B above. You may insert all the (non-optional) tables into the same template component if you wish.
D. COMPLEX TABLES – EMBEDDED
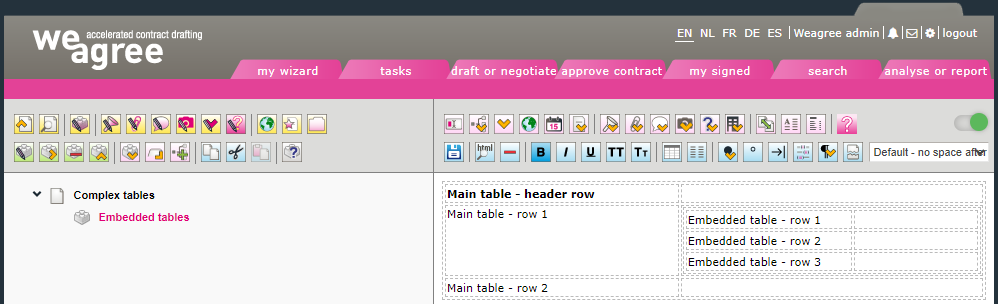
In more exotic cases, you may want to embed tables within tables. This may be necessary to emulate the looks and behaviour of Word tables in which one column has a row spanning the height of multiple rows in another column.
Tables can be directly inserted into existing table cells with the method described in section B above. You will have to use the No borders appearance for such embedded tables, their borders will not exactly overlap with those of the main table. Precision work may necessitate the use of the HTML editor, which is explained here.
The following screenshot illustrates table embedding:
E. TABLE CUSTOMISATION
If the options offered by the TCT’s table creation pop-up are insufficient, tables can be customised further with the use of the HTML editor. It allows you to add more rows and columns, change table cells’ background colours and choose different text formatting options (colour, size and alignment). For more information, click here.
