


Building blocks and contract clauses do not only define the template’s structure, but are containers for its contents: static text and variables. These contents are inserted and managed on the right side of the Template Creation Tool (TCT).
TABLE OF CONTENTS
A. Introduction
B. Simple text insertion
C. Text formatting
D. Miscellaneous text options
E. Variables and content
F. Styles
A. INTRODUCTION
When a building block or contract clause is selected, the right side of the TCT becomes active. At the top is the toolbar, consisting of two rows of buttons. The first is used for the creation of questions and insertion of ‘tags’, which represent certain variables (such as party information, text that must be inserted or omitted based on a question, or a calculated number) or cause other static text to be included in the template (such as schedules). The second is used to format your text. Below the toolbar is the actual text editor.
As also explained in the previous article, the type of template component and its position within the template outline’s hierarchy do not dictate the appearance of its contents. This is instead determined by the text-formatting style selected for that component, which is derived from the Microsoft Word template that was chosen in the template settings. You can deviate from this further (to some extent) with the help of the editor.
The TCT’s editor provides a representation of the text that may make it into a generated document. It is the same as for the WYSIWYG view (‘underwater screen’) in the questionnaire, which shows a preview of the document. Both show simplified HTML (web code), rather than an actual Microsoft Word document’s text. Whichever style has been selected, it will only be applied during document generation. This means that there will be visual differences between the TCT and the final, generated document. Consequently, when editing a template component, the focus should be on its substance instead of its looks.
Nevertheless, there are various ways to customise the exact look of the text. For example, the editor supports basic formatting like bold, italicised and underlined text. For advanced users, there are also a few ways of changing text size and colour. Furthermore, it is possible to split a page’s text into columns and use customised tables.
The rest of this article will cover the basics of text editing and the various buttons’ functionalities.
B. SIMPLE TEXT INSERTION
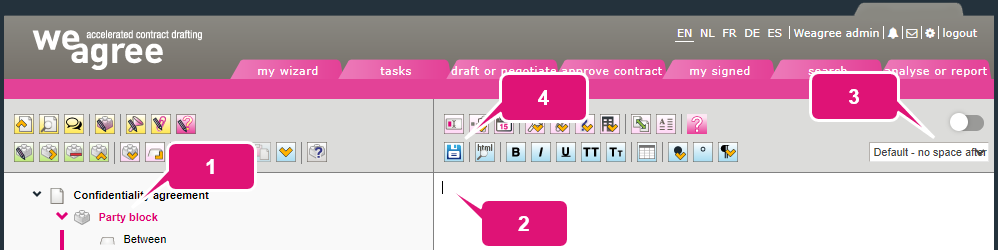
Inserting content into a building block or contract clause is very straightforward:
1. Select the building block or contract clause.
2. Type or paste any previously copied text in the editor on the right (if it already contains any text, you may need to reposition the cursor of course).
Note: it is generally recommended that you only insert a single paragraph into each building block or contract clause.
3. If needed, change the style selection.
Note: as a rule of thumb, choose Level 1 for a building block with the article, section or clause heading; Level 2 for a contract clause directly beneath that building block; and either Level 2 – no numbering or Level 3 for any contract clause below that, depending on whether the Level 2 clause must be followed by a paragraph with the same indentation but without numbering, or by a paragraph with a different numbering scheme and indentation. For more information on styles, see section F below.
4. Click Save the changes made or press Ctrl+S.
C. TEXT FORMATTING
The style selected for the building block or contract clause will be applied when a document is generated and determine the general appearance of a paragraph. However, additional text formatting is possible through the TCT’s editor.
If you have copied text from a Microsoft Word document, certain simple formatting (e.g. when selected text is in italics) will be preserved when you paste it into the TCT’s editor. Keep in mind that the editor uses a filter to remove unsupported or potentially harmful elements and code, however. Otherwise, the editor offers various manual formatting options.
1. To change the appearance of text:
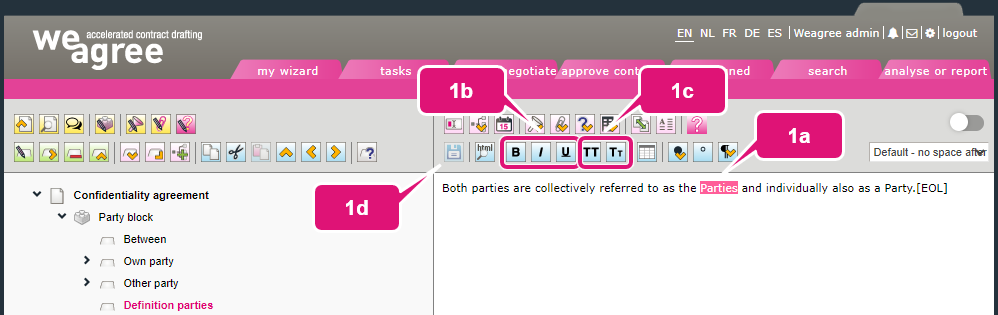
a. Select the text you want to format.
b. Click the applicable buttons or use keyboard shortcuts for bold, italicised, or underlined text (Ctrl+B, Ctrl+I and Ctrl+U, respectively).
c. Click the applicable buttons to render the text in all capitals or in small capitals (the text will change colour when you do; the effect will be fully visible in generated documents).
d. Click Save the changes made or press Ctrl+S.
2. To remove formatting:
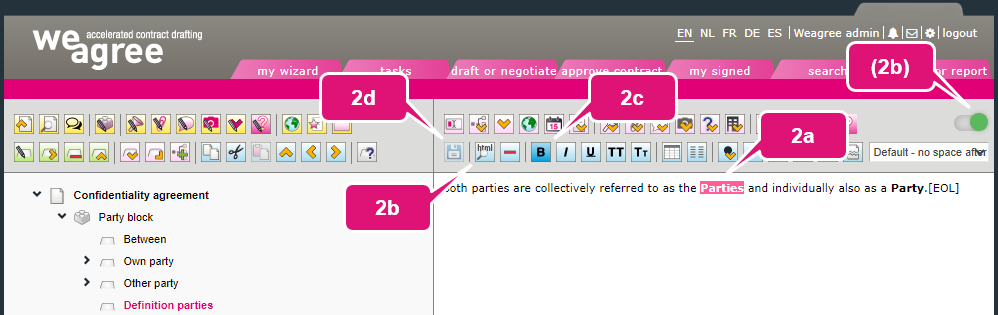
a. Select the formatted text.
b. To remove any formatting, click Remove all (hidden) formatting (this requires that you first enable Show advanced vs. all basic functionalities).
c. To remove specific formatting click the applicable highlighted button or use the associated keyboard shortcut (Ctrl+B to undo bold, Ctrl+I to undo italics and Ctrl+U to undo underlining).
d. Click Save the changes made or press Ctrl+S.
It is also possible to change the text colour, size and alignment for an entire building block or contract clause. For more information, click here.
Additionally, advanced users can customise formatting by editing the HTML of the building block or contract clause. This is the most powerful and versatile method of changing the appearance of text. For more information, click here (see sections A and D).
Note: if you want to change the formatting of a ‘tag’ (i.e. a variable between brackets, such as [edit.Price], [definition.Confidential Information] or [weagreecrm.1.relation.name]), be sure to select the entire tag including the brackets. Otherwise, the tag will no longer function. This is because text formatting is accomplished in the background with HTML tags; if those are inserted inside a tag (i.e. between the brackets), the Weagree Wizard will no longer recognise the entire string as a single tag.
D. MISCELLANEOUS TEXT OPTIONS
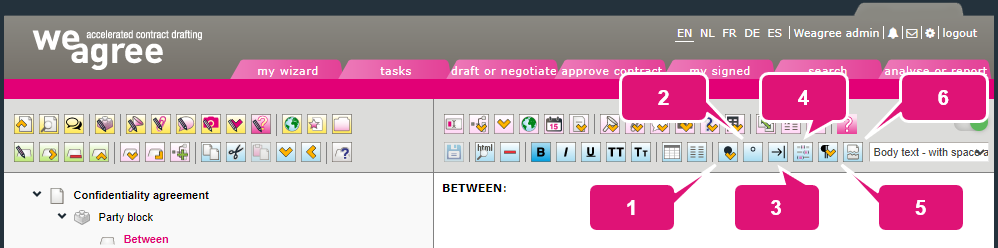
A few other buttons are available for fine-tuning your text. Enable the Show advanced vs. all basic functionalities to display them all.
Insert columns
A page’s text can be divided into two or more columns. For more information, click here.
1. Insert a blob
This inserts a ‘blob’ character into a line, which is a large vertically centred dot. It is the standard placeholder character in the Weagree Wizard, and appears as [*] in the TCT. Because the brackets are removed and the asterisk is converted into a proper blob during document generation, it is usual to manually add double brackets (i.e. [[*]]). The outer brackets will be preserved in the generated document, making it easier to find the blob with a simple search action or visually locate it.
2. Insert a non-breaking space
This inserts a ‘hard space’, which effectively turns the word, number or character immediately preceding it and the one following it into an unbreakable phrase. It appears as [º] in the TCT. This is useful for combinations such as “Clause 2” or “EUR 10,000”, where the second part should never appear at the beginning of a new line. With a hard space, the entire phrase will get pushed to the next line if there’s not enough room left for the second part.
3. Insert a tab-space
This has the same effect as pressing the Tab key at any point in a paragraph in Microsoft Word. It appears as [TAB] in the TCT.
4. Insert a list num
This inserts an in-line automated number. It appears as [LISTNUM] in the TCT. The numbering will be based on the next applicable numbered style level (e.g. if you insert a list num in a contract clause set to the Level 2 style, it will number according to Level 3).
5. Insert a paragraph break
This ends the paragraph and starts a new one. It appears as [EOL] (i.e. “end of line”) in the TCT, but not visibly produce a new line in the editor. Use this if you prefer to include multiple paragraphs in a single building block or contract clause. If a numbered style has been selected, each paragraph will be correctly numbered in the generated document.
6. Insert a page break
This ends the page and starts a new one. It appears as [PAGEBREAK] in the TCT. Like [EOL], the effect is not actually visible in the editor, but only in the generated document.
E. VARIABLES AND CONTENT
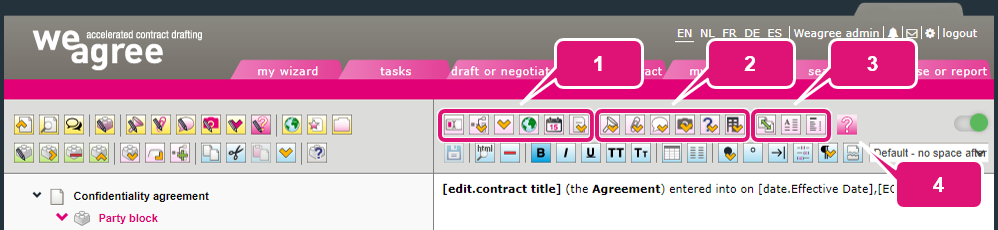
The top row of the right-side toolbar is used to add variables and ready-made content to the template. It is divided into four categories of buttons.
1. Questions
Create different question-and-answer formats, such as free input fields, dropdown menus and date pickers.
2. Libraries
The Weagree Wizard has libraries for different types of content that can be shared across multiple templates, such as definitions, schedules and CRM data (party details). The items from these libraries can be directly inserted or referenced using these buttons.
3. Document contents
Add basic elements relating to the document – a table of contents, cross-references and captions (clause headers).
4. Questionnaire elements
Edit any question within the building block or contract clause.
The use of all these buttons is explained in separate, in-depth articles.
F. STYLES
In Microsoft Word, formatting text is facilitated by the use of predefined paragraph styles. These contain settings for font type, text size, numbering, indentation, and so on. The Weagree Wizard makes extensive use of such styles, for ease of use as well as to promote uniformity across documents.
All styles are contained in a ‘dotx’ file, or a Microsoft Word template. There is always at least one such Word template on any Weagree Wizard portal, but any number of them may be added and each can be fully customised (for more information on this, click here). They are all based on a basic Word template created by Weagree, however, with a number of standard styles. In the TCT, these styles can be applied to individual building blocks and contract clauses.
The best way to learn how the different styles work and what their precise characteristics are in any given Word template is to generate a document through Weagree’s Q&A. The document will be created using the Word template and therefore include all available styles. You can then simply examine and experiment with them.
When you are learning how to insert a template, though, you do not need to be familiar with all styles or understand all their specifics. In general, the following are the most important (listed in their order of appearance in the TCT):
a. Party clause: numbered, used for the list of parties at the start of the contract.
b. Whereas clause: numbered, used for the recitals (background description) preceding a contract’s provisions.
c. Default – no space after: not numbered or indented, used for basic text that does not need to be followed by a blank line.
d. Body text – with space after: not numbered or indented, used for basic text that does need to be followed by a blank line.
e. Level 1: numbered, used for headings of provisions, often in bold print and sometimes in all-caps (e.g. “1. DEFINITIONS“).
f. Level 2: numbering derived from Level 1, used for actual clauses and sections (e.g. “2.1 Each Party may furnish Confidential Information…”).
g. Level 2 – no numbering: identical to Level 2 but not numbered; typically differentiated from Body text – with space after by its indentation.
h. Level 3: usually reserved for lists, though sometimes using numbering derived from Level 3 for full subparagraphs (e.g. “(a) …; (b) …; and (c) …” or “3.1.1 …”).
