


In many cases, the answers to a question will need to be (mostly) predefined. This is where choice fields (or ‘choice question’) come in. Instead of offering regular input fields, they force the user to choose one or more options from a preconfigured list of possible responses. Doing so provides the greatest level of control over a questionnaire (Q&A) and its outcome. Choice fields are extremely versatile and can be used to insert the right words, sentences, clauses and numbered lists wherever they are needed.
Mastering the use of choice fields is essential for effective contract automation. However, they are also considerably more complex to set up than for example editable and data fields. Carefully review each of the sections below when you are still learning how to use the Template Creation Tool (TCT)
TABLE OF CONTENTS
A. Creating a choice element
B. Organising choice answers
C. Checkboxes and multi-select dropdowns
D. Adding text to choice answers
E. Inserting and finalising the choice field
F. Optional and advanced settings
G. Editing a choice field
H. Removing a choice element
I. Troubleshooting
A. CREATING A CHOICE ELEMENT
Adding a choice field to your template begins with the creation of a choice element (or ‘choice tree’) . Unlike other variables, choice fields primarily exist on the left side of the TCT, within the template outline.
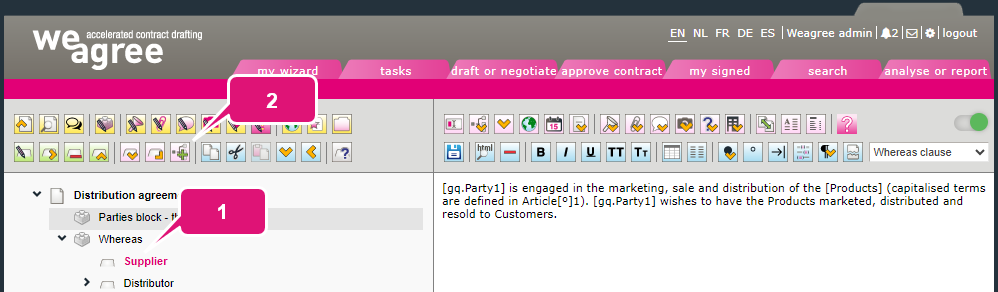
1. Select the template component where the choice field must be inserted.
2. Click Insert a choice element (for radiobutton, dropdown or checkbox questions). A pop-up will appear.
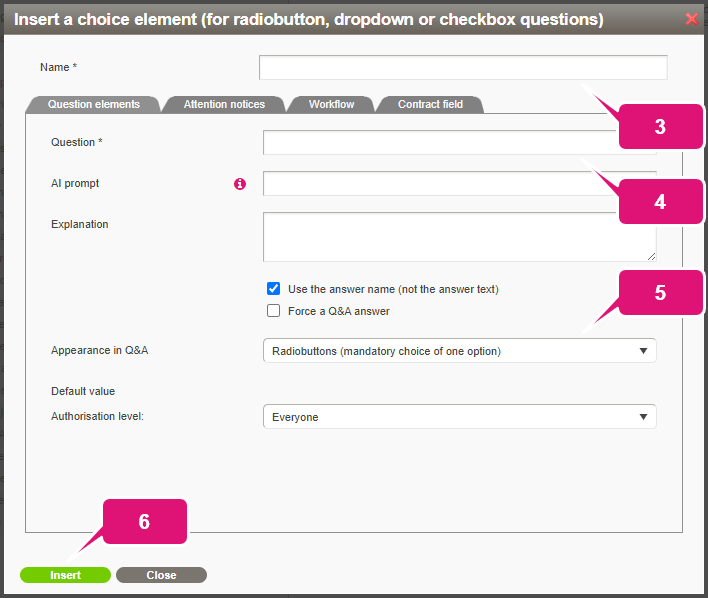
3. Enter a name for the choice field. It will be reused later in a tag within the template component. You may use spaces. A short, descriptive name is recommended.
4. Formulate the question. This will be shown to the user in the Q&A.
5. Select (and if applicable, further configure) the appearance of the choice answers (or ‘answer options’) in the Q&A:
a. radiobuttons or a dropdown if the user may only select one choice answer; or
b. checkboxes or a multi-select dropdown list if they user should be able to select any combination of answers (see section C below for further instructions on their use).
Note: dropdowns tend to be preferable for questions with many choice answers and Q&A pages with many questions. Dropdowns are also better for questions that may be left unanswered, as they always include a ‘blank’ option (actually the default setting).
6. Click Insert. Another pop-up will appear.
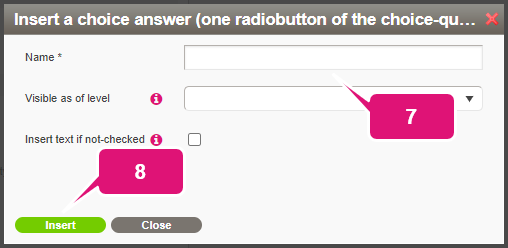
7. Enter a name for the first choice answer. By default, this will be shown to the user in the Q&A.
Note: you can change the Visible as of level setting to hide the choice answer from users with a lower authorisation level. This may be indicated for sensitive or complex matters that not every user is or should be able to determine. For choice fields with just a single answer, hide the question as described at step 5 of section F below instead. For more information about authorisation levels, click here.
8. Click Insert.
Section D below explains how choice answers are actually used.
B. ORGANISING CHOICE ANSWERS
After the first choice answer has been created, you may add any number of additional ones. Existing choice answers can also be edited and their order rearranged.
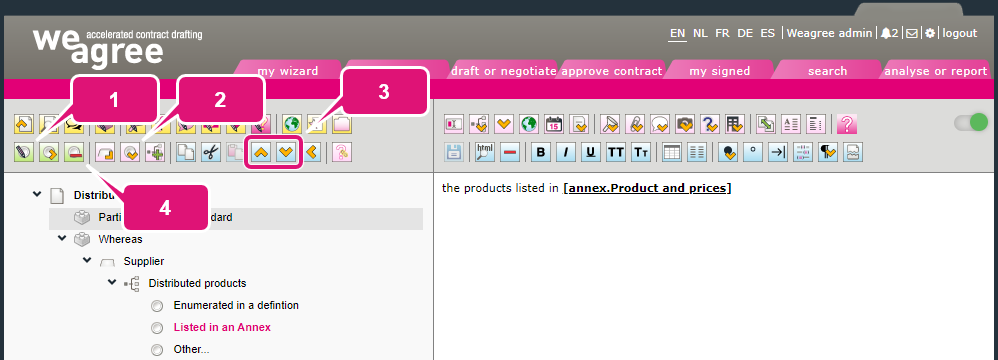
1. To edit a selected choice answer, click Edit the choice-option name.
2. To add a choice answer below the one currently selected, click Insert a choice answer (one radiobutton of the choice-question) and repeat steps 7 and 8 of section A above.
Note 1: for a ‘yes/no’ question, it is often enough to only use one choice answer. For more information, see section D below.
Note 2: if the required options are especially numerous, it may be more practical to use a lookup list instead. For more information, click here.
3. The order in which choice answers are shown in the Q&A matches that of their order in the TCT. To change a selected choice answer’s position, click Move the component upwards or Move the component downwards as many times as necessary.
Note: there is also a left-pointing arrow, which changes the choice answer’s indentation. This will convert it into a standalone building block or contract clause, depending on its initial position within the template outline. Ordinarily, you will not need to use this button.
4. To delete a selected choice answer and everything it contains (see section D below), click Delete this choice-option (and everything underneath it).
C. CHECKBOXES AND MULTI-SELECT DROPDOWNS
When the user must be allowed to select multiple choice answers at once, the choice field will need to take the appearance of checkboxes or a multi-select dropdown as detailed above. The choice between either comes down to the same considerations as the choice between radiobuttons and a single-choice dropdown. A few additional configurations will be required, however..
In most cases, selecting any choice answer will result in the direct insertion of some text into the document. This happens at the location of the choice field’s tag, as will be further explained in section E below. Consequently, selecting multiple choice answers at once will result in multiple, successive text insertions at the same location. That necessitates the insertion of some dividing text between the inserted bits of text; otherwise, you would end up with different words unintentionally being stuck together.
For example, if the user is asked to which territories a Distributorship agreement will apply, and the user selects “Europe”, “the Middle East” and “North America”, this would normally insert “Europethe Middle EastNorth America” into the document.
To prevent this from happening, three ‘separator’ fields will appear when you choose checkboxes or a multi-select dropdown for your choice question:
- Default value separator: the standard text inserted between one choice answer’s text and another’s.
- Penultimate separator: the text inserted directly after the second-to-last selected choice answer.
- Closing character: the character (or other text) inserted directly after the last selected choice answer.
There are three basic scenarios to distinguish.
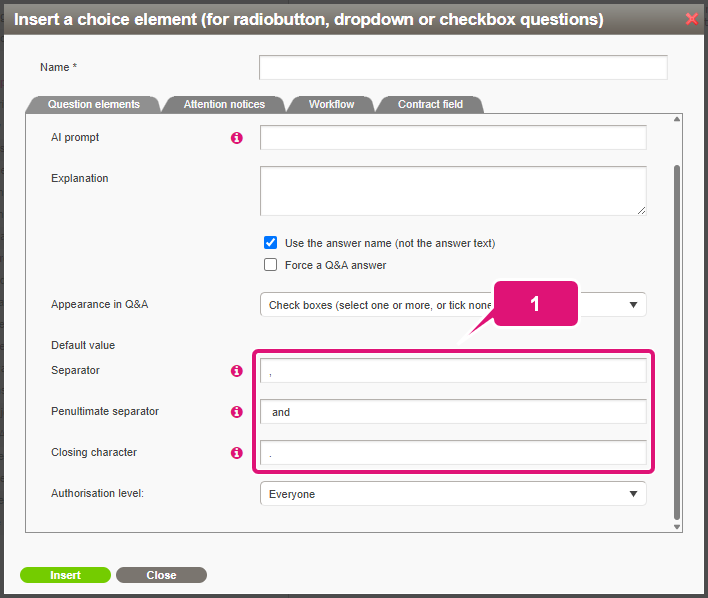
1. Text that must be inserted on the same line:
a. For the default separator, enter “, ” (command and space).
b. For the penultimate separator, enter ” and ” (with a space before and after).
c. Optionally, add a closing character/separator like “.” (full stop) or “; ” (semicolon and space).
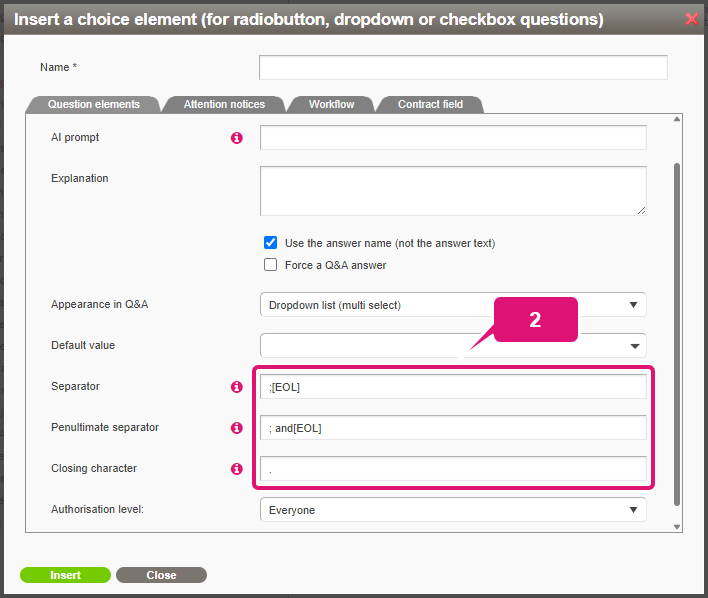
2. Text that must be on separate lines, creating a list:
a. For the default separator, enter “[EOL]” (this will produce an ‘end of line’, or paragraph break). You may also want to include a comma, semicolon or full stop (e.g. “,[EOL]”).
b. For the penultimate separator, use either the same text as for the default, or add “and”/”or” to it (e.g. “; and[EOL]”).
c. Optionally, add a closing character like a full stop.
3. Text that must be inserted as one or more separate complete paragraphs (not in list form, though possibly numbered). In this case, selecting choice answers must result in the inclusion of entire contract clauses (explained further in section D below). In this case, the separator fields must be left blank.
D. ADDING TEXT TO CHOICE ANSWERS
It is important to understand that a choice answer created in the template outline only adds an option to the question in the Q&A. Selecting that option will not affect the document being created, unless text has been added to the choice answer first. This happens on the right side of the TCT and works the same way as adding text to a building block or contract clause.
In other words, the actual text that must be inserted when a choice answer is selected must be entered in the body text editor. This text can be identical to the choice answer’s name, but does not need to be. A choice answer’s contents can take one of four basic forms.
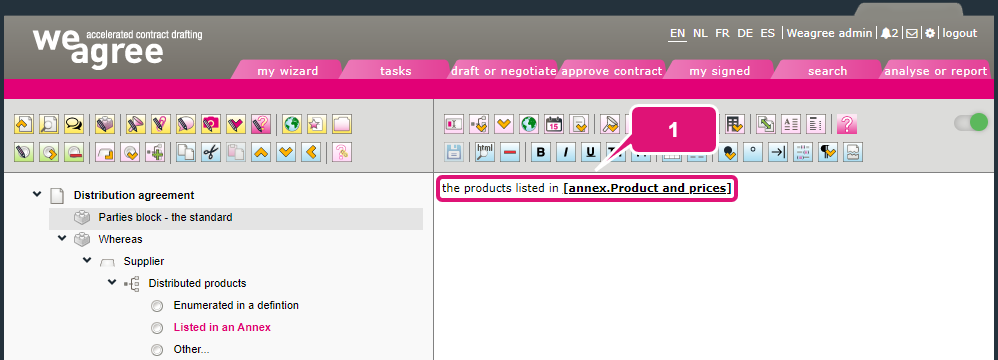
1. Simple text:
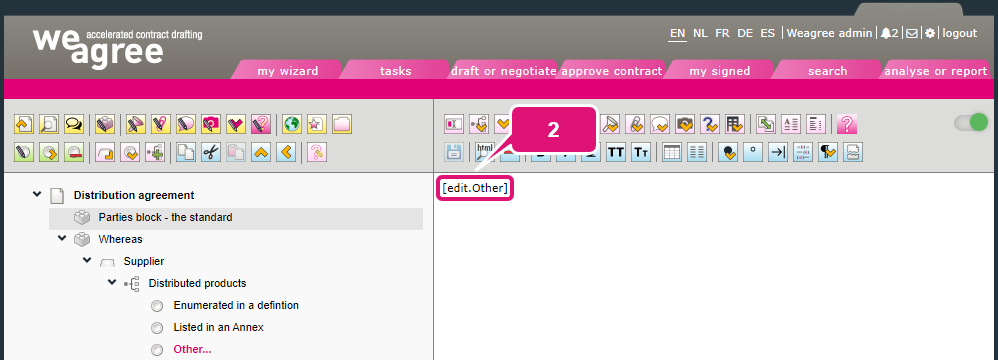
2. (Simple text with) a follow-up question:
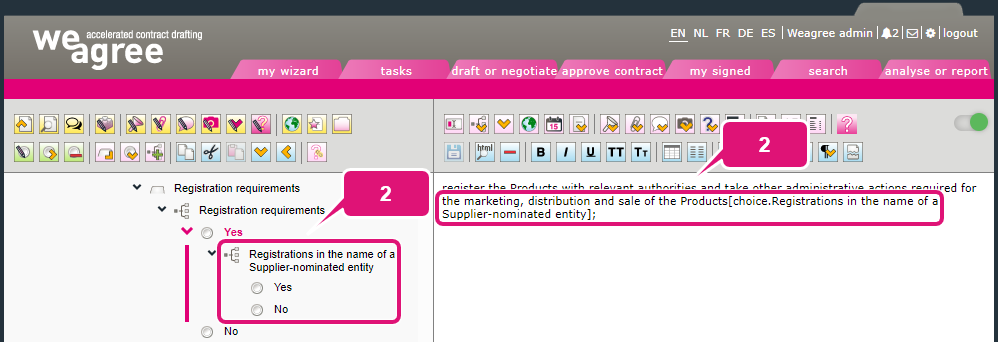
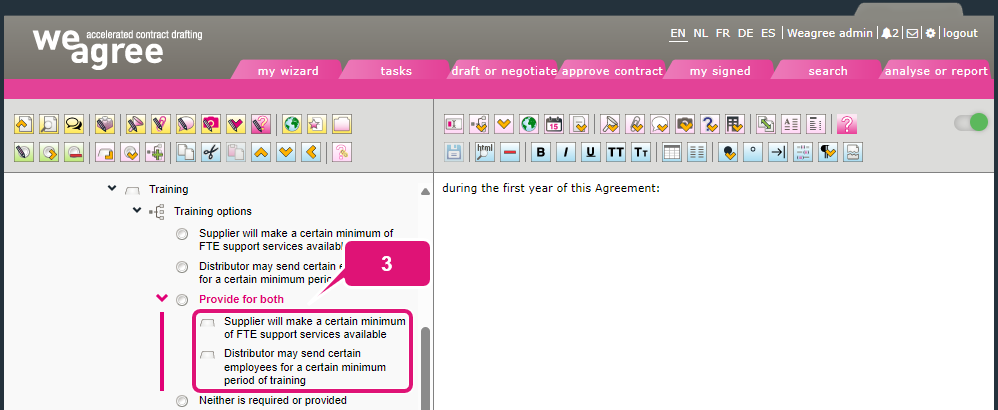
3. (Simple text with) one or more contract clauses, which can be added just like you would add them to the template outline proper:
Occasionally, you may want to deliberately leave an answer choice empty. For example, when a simple ‘yes/no’ question must cause one piece of text to be either included or excluded, it may suffice to leave the body text of the choice answer No entirely blank. That is perfectly valid if you want to let the user explicitly select that answer.
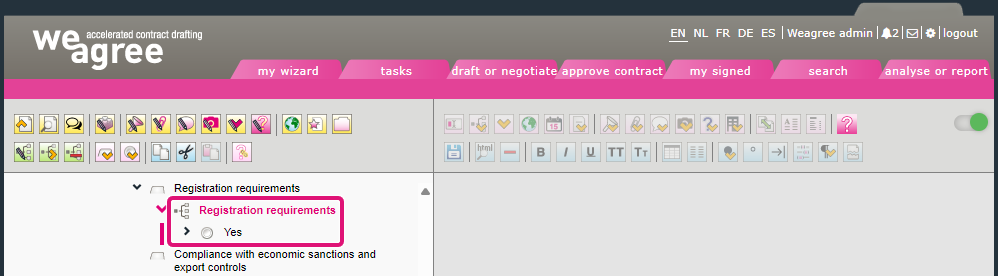
Keep in mind, however, that the same effect can usually be achieved with just a single choice answer (see the example below). If only one choice answer is available, the Q&A will automatically convert it to a checkbox regardless of the appearance chosen at step 5 of section A. The user’s actual answer is then determined simply by whether the box has been checked or not. If the choice answer is named Yes, then leaving it unchecked implicitly means ‘no’ and no text is inserted.
A second alternative to having explicit ‘yes’ and ‘no’ options is to make use of the ‘if not checked’ functionality. This is for advanced users who want to create if-else mechanisms, where not selecting a particular choice answer means something else is inserted instead. This can obviously be used for non-binary choice questions as well. For more information, click here.
E. INSERTING AND FINALISING THE CHOICE FIELD
Once the choice element, answer options and their contents are in place, the choice field can be inserted into the template component’s body text. Choice fields use the tag format [choice.Name]. The tag will be replaced by the contents of the choice answers selected by the user.
Insertion of a choice tag is a prerequisite for triggering a choice field: without a tag, the choice question and answers will not appear in the Q&A.
1. Select the text that must be replaced by the selected choice answers (or position the cursor where they must be inserted).
Note: if entire contract clauses will be inserted, it is generally best to do so at the very end of the (last) paragraph. Any text that should follow the last inserted contract clause is best added to a separate building block or contract clause, below the one that contains the choice element.
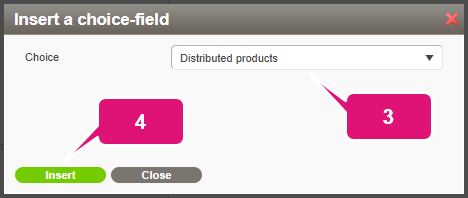
2. Click Insert a choice-field (created on the left hand side). A pop-up will appear.
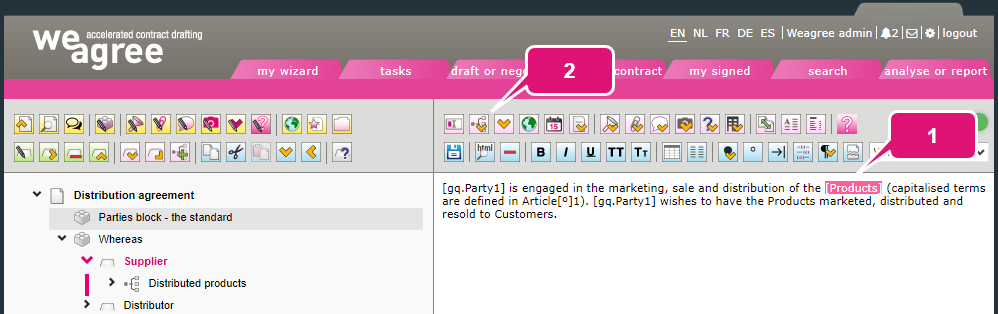
3. Select the applicable choice field.
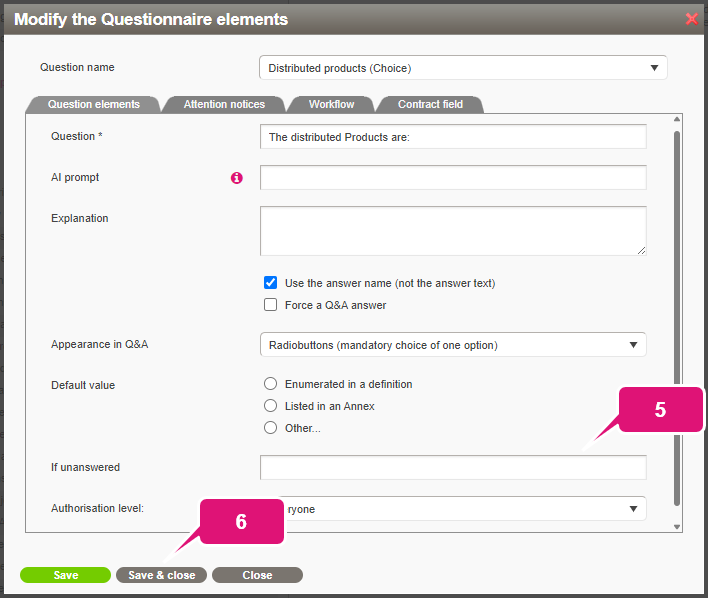
4. Click Insert. Another pop-up will appear, largely identical to the one from steps 3-6 of section A.
5. Unless text insertion here is completely optional, enter an If unanswered placeholder. This placeholder will appear in the Q&A’s WYSIWYG view (‘underwater screen’) and generated document if no other answer has been provided.
6. Click Save & close.
7. Click Save the changes made (or press Ctrl+S).
F. OPTIONAL AND ADVANCED SETTINGS
When inserting or editing (see section G below) a choice field, you may also want to consider the following settings.
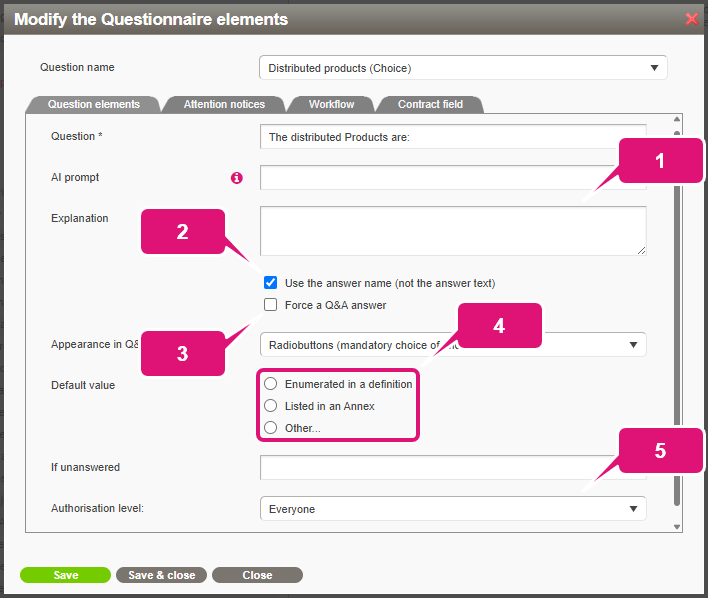
1. Enter an explanation to provide user guidance for answering the question. In the Q&A, a small warning icon will be displayed to the right of the question. The icon will have the explanation as its tooltip.
2. Deselect Use the answer name (not the answer text) to show the text that will actually be inserted as the answer option in the Q&A. You might do this if you prefer to keep the choice answer names as succinct as possible in the template outline.
3. Enable Force a Q&A answer if this question must be answered before the user may generate a document.
Note: this will not visually change the Q&A. Consider adding an explanation or attention notice – see below – to alert the user to this field’s mandatory nature.
4. Select a choice answer as the default value if it will usually be applicable. It will be automatically selected at the start of the Q&A for the user to double-check and change if necessary.
5. Change the authorisation level if the question should be hidden from certain users. This may be indicated for sensitive or complex matters that not every user is or should be able to determine. For more information about authorisation levels, click here.
Note: be aware that if a question is hidden this way, it will still be taken into account when generating a document. It is therefore highly recommended to at least fill in the If unanswered field (so that a senior member will be able to easily find and correct this variable in the generated document). If possible, however, provide a default value so that a generally acceptable answer will always appear in the document.
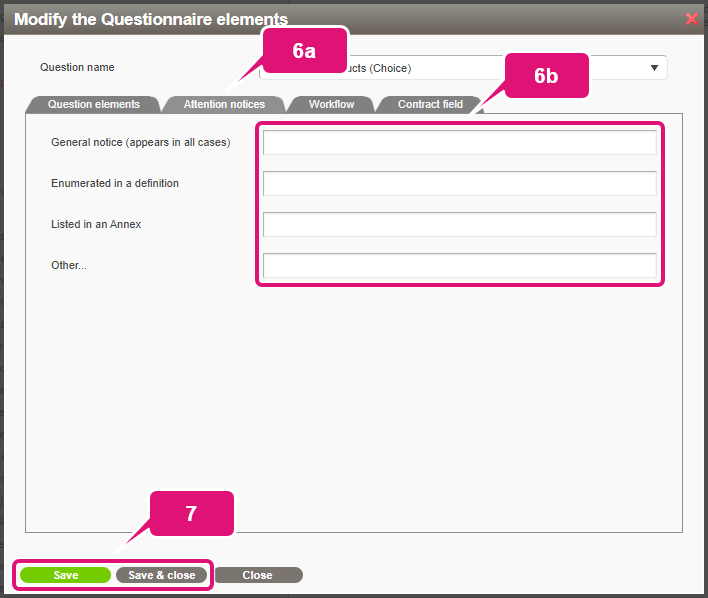
6. Add one or more attention notices (bold, magenta text displayed beneath the question during the Q&A) for especially important explanatory information:
a. Open the Attention notices subtab.
b. Enter the attention notices. Apart from the General notice, which is always visible, each will appear only if the corresponding choice answer has been selected.
Note: if Force a Q&A answer has been enabled, it is often a good idea to add an attention notice pointing out that this field is mandatory. This will help prevent confusion at the end of the Q&A and make the field easier to find again if it is initially skipped for any reason.
7. Click Save (or Save & close if Modify the questionnaire elements was clicked and you do not need to edit any other question in the same template component).
G. EDITING A CHOICE FIELD
Once created, all aspects of a choice field can be edited.
1. Select either:
a. the choice element in the template outline; or
b. the template component containing the choice element.
2. Depending on which was selected at step 1, click either:
a. Edit the choice name; or
b. Modify the questionnaire elements (question formation, default answer or explanation).
A pop-up will appear.
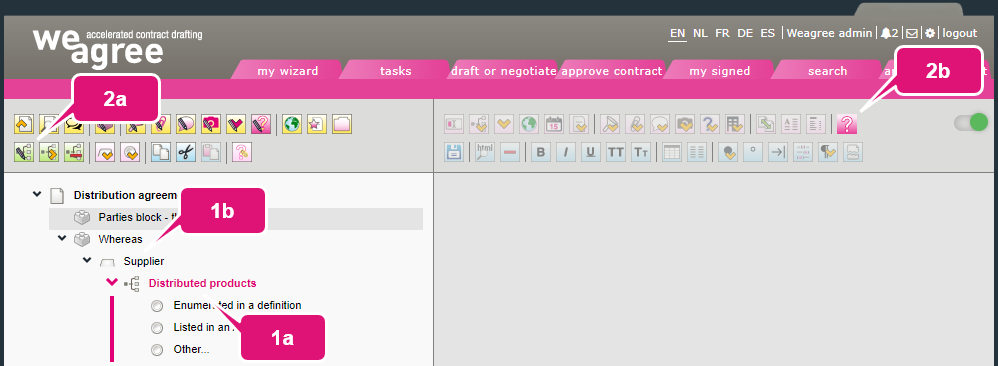
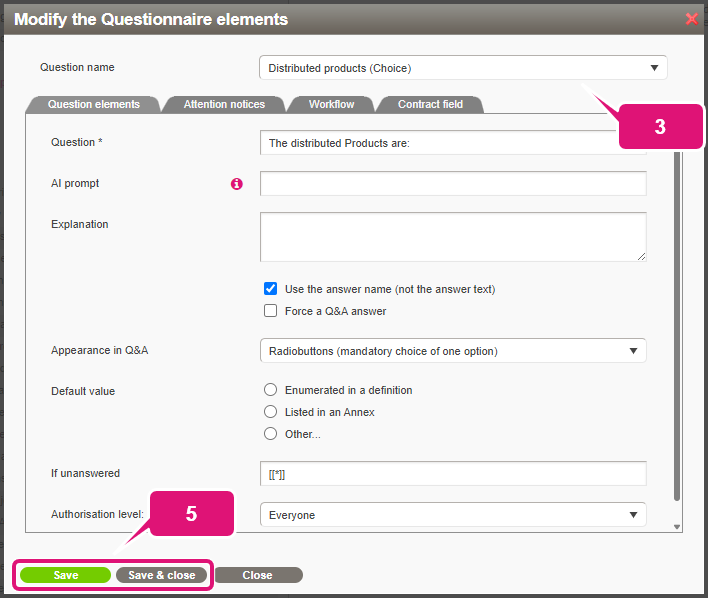
3. If Modify the questionnaire elements was clicked, first select the applicable question (if the template component contains more than one).
4. Make the necessary changes.
5. Click Save (or Save & close if Modify the questionnaire elements was clicked and you do not need to edit any other question in the same template component).
H. REMOVING A CHOICE ELEMENT
Unlike other variables, a choice field cannot be removed just by deleting its tag from a template component’s body text. The actual choice element must be deleted as well.
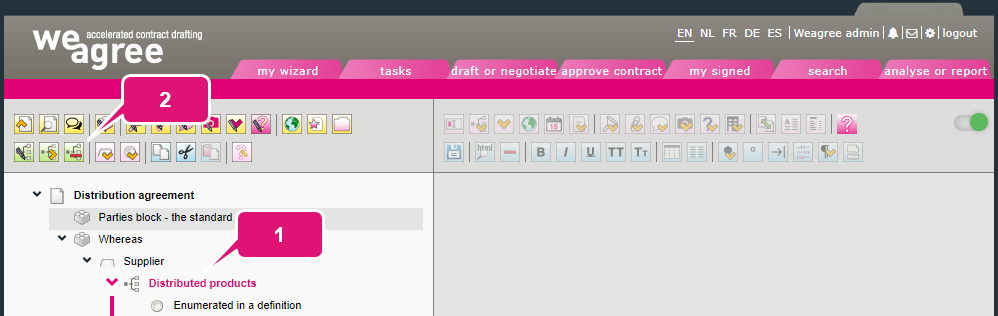
1. Select the choice element.
2. Click Delete this choice (and everything underneath it).
Note: be careful with this, as it will result in the deletion of not just the choice element and its choice answers as such, but everything they contain: text, follow-up questions and contract clauses.
I. TROUBLESHOOTING
Due to their complexity, issues with choice fields are much more common than with other question types. For help with missing choice questions in the Q&A, click here; for help with missing text after selecting a choice answer, click here.
