The Weagree Wizard supports different user-interface languages (translations). Besides choosing a default language, other languages may be offered to the user to choose between for everyday use. As a user, switching between one activated translation of the user interface and another is just a matter of selecting another from the top of the screen.
Note: while administrators can add or edit translations, it is strongly recommended that you leave such changes to Weagree. Editing Weagree’s official translations yourself may result in complications when features are added or changed afterwards, while Weagree may add additional languages that end up overwriting your own translations. Please contact Weagree at support@weagree.com if you have suggestions for changes or additional languages.
All translations are collected and organised on the Administrator page under Configuration Weagree Wizard > Languages user-interface.
1. To add a new language:
a. Click Insert.
b. Select the applicable culture (variety of the language).
c. Enter the name for the translation.
d. Optionally, disable Is active for the time being. This will hide language from the options at the top of the screen.
e. Click Save.
Note: this will only add the language option. You will still need to separately upload a spreadsheet containing the full translation. See number 6 below.

2. An existing language option’s culture, name and activation can be changed by clicking on its code in the list.
3. The order in which the language options appear at the top of the screen (from left to right) can be changed by clicking the up and down arrows.
4. Click Delete to remove any selected language (translation).
Note: only do this if this is considered absolutely necessary. Ordinarily, deactivating a language option will suffice.
5. To export a translation to an Excel file:
a. Click the language’s code.
b. Click Export. A pop-up will appear.
c. Select the resources (containers of various user-interface texts) you require.
Note: in almost all cases, it is best to select all available resources. Click the checkboxes in the table headers to select all resources within that table.
d. Click Export.
Note: it maky take a few seconds for the file to be ready for download. Every export will contain the default, English texts in the DefaultValue column (column C). Edit or add translations to column D.
6. To add or overwrite a translation:
a. Click the language’s code.
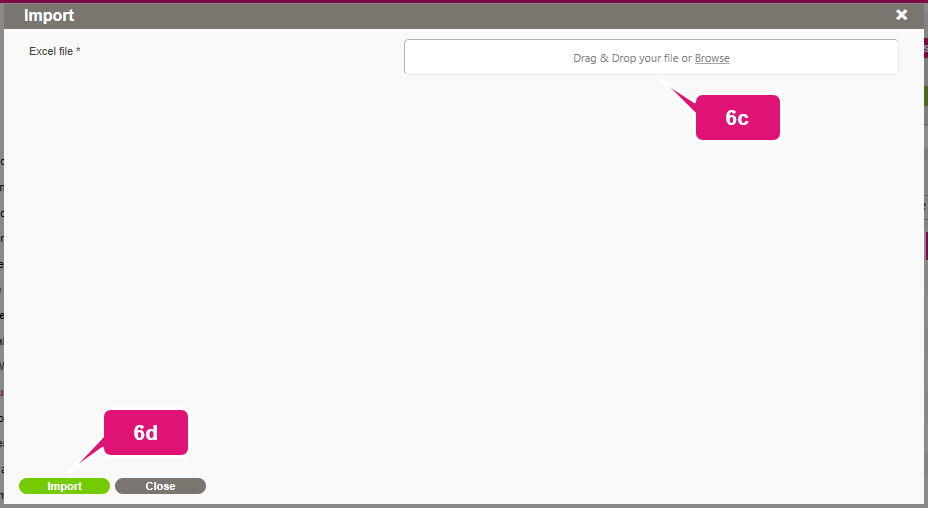
b. Click Import.
c. Drag-and-drop the file to the Excel file field, or click on the field to browse your computer or network for the file.
d. Click Import.
Note: it may take a few seconds for the translation to be processed. The pop-up will report the number of resources changed as a result of the import.
e. Close the pop-up after the import is complete.
7. Click Reset to restore the default language settings.