


All primary contract-related actions in the Weagree Wizard result in the creation of automated tasks (e.g. when creating a new contract, when generating a document, when initiating e-signing, and so on). Certain logical follow-up actions will then automatically complete them and possibly generate another automated task as well. Any automated task may send out one or more default e-mail notifications. All these automated tasks, their details and their notification triggers can be found and configured on the Administrator page, under Tasks management > Automated tasks.
Note: all following steps are optional. The tasks functionality can be used out of the box. If you want tasks to also generate notifications, however, you must still create notification triggers as described below. Always click Save after making any changes.
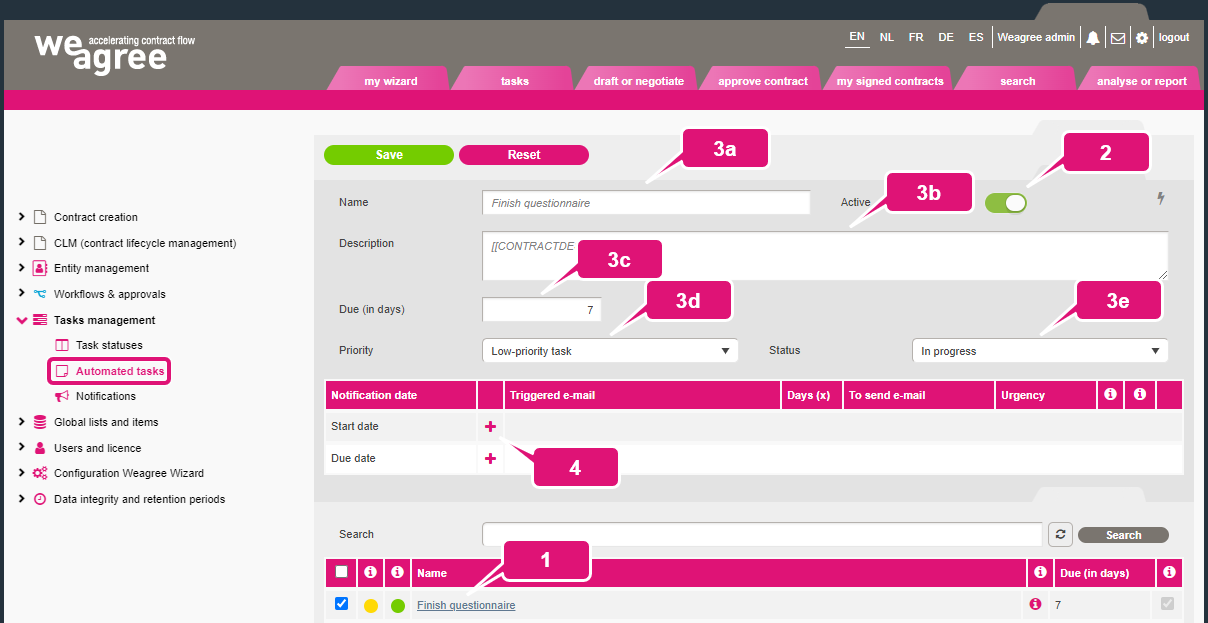
1. Click the automated task’s name.
2. Disable Active if you do not want this type of automated task to be used. Users will still be able to manually create equivalent tasks.
3. You can make the following basic changes to any task:
a. Its name (the greyed-out text represents the default name). This will appear prominently on the tasks Kanban and in the list view.
b. Its standard description (the greyed-out text represents the default description). This will appear below the task name on the Kanban and as an information icon’s tooltip in the list view.
Note: some tasks’ descriptions may include tags, such as [[CONTRACTDESCRIPTION]]. This will be replaced for individual tasks with the corresponding text (in this case, the contract description as seen on the Draft or negotiate overview, for example). You may also include these tags in your custom task descriptions.
c. The default number of days in which the task should be completed (users can still change the actual deadlines for their individual tasks).
d. Its priority (this is visualised on the tasks Kanban and list to assist users, but does not affect how the task works or relates to other tasks).
e. Its initial status.
4. You can also add standard notification triggers for this type of task, which will apply to all users, by clicking the appropriate plus sign.
5. To configure a trigger, use the settings contained in the seven columns following the notification date (from left to right):
a. Triggered e-mail: this setting determines at what general point in time the e-mail notification will be sent: before, on or after the date specified in the entity’s or person’s corporate housekeeping.
b. Dayx (x): if the triggered e-mail notification will be sent before or after the specified date, use this setting to determine the precise moment (e.g. insert “30” to send a notification 30 days before or after the date).
c. To send e-mail: select the type of e-mail to be used for the notification. For more information, click …
d. Urgency: when the e-mail notification is triggred, …
e. Additional users: click the icon to add additional users to notify by default. Otherwise, notifications will only be sent to the owner of the template.
f. Enabled: tic or untick this checkbox to enable or disable the e-mail notification trigger.|
g. Delete: click the minus sign to delete the e-mail notification trigger.

