


The Weagree Wizard’s SAML (or LDAP) integration allows for single sign-on (SSO) authentication, requiring only that the user is logged in on your secure network in order to gain access to the Weagree Wizard (i.e. there will be no separate login page for Weagree). This also allows for automatic user registration.
SAML integration can be enabled and configured as follows.
TABLE OF CONTENTS
A. Certificates
B. SAML
C. Access provisioning
A. CERTIFICATES
To access the Weagree Wizard via SAML, you will need to provide at least one certificate (key). Optionally, you may also generate a Weagree Wizard certificate for validation of the ID provider. First, on the Administrator page, navigate to Configuration Weagree Wizard > Key management.
1. To add a new certificate:
a. Click Insert.
b. For Type, select File to upload a certificate, or PEM to directly paste the key into the Weagree Wizard.
c. Enter a name for the certificate.
d. For Certificate, depending on your choice under step 2 above, either upload the appropriate file via the drag-and-drop/browser field or paste the key into the text field.
e. Click Save.
Note: it is possible to upload multiple certificates to serve different purposes.
2. To create a Weagree Wizard certificate, click Generate.
3. To delete a certificate, select it and click Delete.
Note: expired versions of certificates may be freely deleted, but this is not obligatory.

B. SAML
To configure SAML, on the Administrator page, navigate to Configuration Weagree Wizard > Login & user authentication.
1. Ensure External authentication is enabled. If not, move the switch to the ON position and click Save.
2. Click on SAML under External login providers.

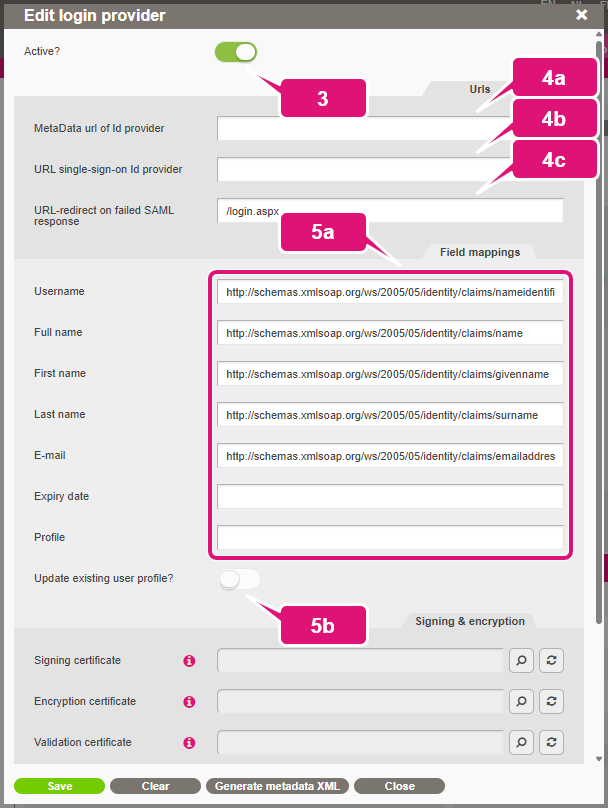
3. The pop-up Edit login provider will open. Enable the Active? switch to use SAML.
4. Under Urls:
a. Optionally, insert the URL for your SSO ID provider’s metadata (XML). This is currently only for reference purposes.
b. Insert the unique URL for your SSO ID provider’s services.
c. Optionally, change the URL to which users are redirected if no SAML response is received. It points to the Weagree Wizard login page by default.
5. Under Field mappings:
a. Match the Weagree Wizard’s user details with the namespaces (field names) used in your SSO configuration. If you are not using custom names, you can simply use the standard XML SOAP namespaces.
Note: you can use SSO metadata to set expiry dates for Weagree user accounts, as well as to assign Weagree user profiles. The latter is only possible if the profile name provided upon SSO matches the name of a user profile in the Weagree Wizard, however.
b. Optionally, enable Update existing user profile? to automatically change a user’s Weagree Wizard profile if the value of the applicable namespace changes (e.g. when the user is promoted or moves to another business unit). If disabled, a Weagree Wizard administrator will have to manually change the user’s profile when needed.
6. Under Signing & encryption:
a. Select the uploaded signing certificate.
b. Optionally, select the (most recent) uploaded encryption certificate.
Note: it is possible to select the same certificate for both signing and encryption.
c. Optionally, select the (most recent) certificate generated by Weagree for validation of the ID provider.
d. Optionally, depending on your SSO’s preferred method, change “POST” in the SP-to-IdP binding and IdP-to-SP binding fields to “GET”.
e. If a validation certificate has been selected, you may enable Validate message from IdP?; otherwise, this should be left disabled.
7. The Generate metadata XML button will produce an XML file with Weagree’s metadata, which can be used for ID provider validation.
8. Click Save.

C. ACCESS PROVISIONING
A Weagree Wizard account will automatically be created when a member of your organisation uses the SSO connection to access your Weagree portal. On the Administrator page, under Configuration Weagree Wizard > Login & user authentication, several related settings can be found.
1. By default, the account created through SSO will remain inactive (preventing the user from actually logging in on the Weagree Wizard) until an administrator activates it via Users and licence. instead accounts should be automatically and assigned a standard profile, enable Active upon first login.
2. Regardless of whether accounts created through SSO should be automatically activated, always select a Default user profile.
Note: administrators may assign different profiles to individual users at any point after account creation.
3. Optionally, select a Legal approver. Contracts created by accounts created through SSO will then always be submitted for review to the selected user (the user will not be able to generate a document until approval has been given).
Note: it is usually advisable to leave this blank. If approvals are required, it will in most cases be better to set up generally applicable approval workflows. For more information, click here. Administrators may also designate different legal approvers for individual users at any point after account creation.
4. Optionally, select a Default own party. This entity from the Own party database (entity management) will then be selected by default when users with accounts created through SSO start new contracts.
Note: administrators may select different default parties, or remove the default selection altogether, for individual users at any point after account creation.
5. Click Save.
6. To effect the SAML setup and all of the related changes, click Restart the Weagree application.
Note: restarting the application will interrupt concurrent user actions. If the portal is already in active use, it is recommended that you notify all potentially affected users at what time the application will be restarted, or execute a restart at a time when none are (expected to be) using the Weagree Wizard.

