


The Weagree Wizard’s SharePoint integration allows the user to seamlessly store any contract or entity-related file, generated in Weagree or manually uploaded, on SharePoint. SharePoint sites, folders and dynamic paths can be selected or configured to determine where any file will be stored by default (dependent first and foremost of the user’s access rights within SharePoint itself and with the option to provide certain users more freedom in choosing a precise storage location). Any such file can then be retrieved or even directly edited again from within the Weagree Wizard at any time, as if it were stored in Weagree itself.
SharePoint integration can be enabled and configured as follows.
TABLE OF CONTENTS
A. Azure
B. Weagree Wizard – connection
C. Weagree Wizard – contracts and projects
D. Weagree Wizard – user customisation
E. Weagree Wizard – entity management
A. AZURE
1. Go to https://portal.azure.com/#view/Microsoft_AAD_RegisteredApps/ApplicationsListBlade and click on New registration.
Note: if you have already set up an integration with Microsoft Entra ID for single sign-on, it will not be necessary to register a new app. In that case, select the existing app and skip to step 9 (API permissions) below.

2. The page Register an application will load. Here, you must:
a. enter a descriptive name
b. under Supported account types, select Accounts in this organizational directory only ([your default directory] only – Single tenant)
c. under Redirect URI (optional), select Web as platform and insert the applicable address: https://[portal name].weagree.com/signin-microsoft
d. click Register

3. The Overview of the new app will load. In the menu on the left, click Authentication.

4. Under Implicit grant and hybrid flows, select both Access tokens (used for implicit flows) and ID tokens (used for implicit and hybrid flows).
5. Click Save.

6. In the menu on the left, click Certificates & secrets.
7. Click New client secret.
8. The Add a client secret panel will open. Enter a fitting description, select a duration and click Add. A new client secret will appear on the page, with an expiration date, a Value and a Secret ID.

9. In the menu on the left, click API permissions.
10. Click Add a permission.

11. The Request API permissions panel will open. Here you must:
a. click Microsoft Graph
b. click Delegated permissions and then tick the following permissions (you can use the search bar to quickly find them):
-
- Files.ReadWrite.All
- offline_access
- openid
- profile
- Sites.Read.All
c. click Application permissions and then tick Sites.Selected
d. click Add permissions


12. On the API permissions page, click Grant admin consent for [your default directory].

B. WEAGREE WIZARD – CONNECTION
After the application in Azure has been fully configured as described above, it’s time to make the connection in Weagree. For this, you will need to first navigate to Configuration Weagree Wizard > Login & user authentication on the Administrator page.
1. Enable External authentication if it is not active yet.
2. Select Microsoft from the Login technology column.

3. The pop-up Edit login provider will open. Here, you must:
a. enable Active
b. in the Application (client) ID field of the pop-up, insert the string of characters next Application (client) ID on the Overview page of the Azure app, as mentioned above
c. in the Client secret field of the pop-up, insert the string of characters under Value on the Certificates & secrets > Client secrets page of the Azure app, as mentioned above
d. in the Directory (tenant) ID field of the pop-up, insert the string of characters next to Directory (tenant) ID on the Overview page of the Azure app, as mentioned above (note: you may need to save your previous settings and reopen the pop-up for this field to become visible)
e. click Save

4. In the menu on the left, click API integrations.
5. Click SharePoint.
6. On the subtab SharePoint that appears on the right, switch on the Active button.
7. On the subtab File storage that appears below it, switch on the Active button.
8. Click the magnifier icon for each SharePoint site field to select the SharePoint site where documents of the applicable category should be saved.
Note: you must always select a Catch-all fallback site; this will be used in the event none of other options are configured or happen to apply.
9. Insert a format for the default (Catch-all fallback) folder structure. Note the following:
a. If left blank, files will be stored in the root of the SharePoint site.
b. You can click the magnifier icon next to the Folder structure field to add variables like the contract description or a party name.
Example: Contracts/[relation.2.shortName] will store files on the designated SharePoint site, within the Contracts folder and in subfolders matching the short names for the counterparties.
Note: for contracts and projects, it is possible to deviate from this default setting, both on the administrator and the end-user level. Administrators may customise the storage location for individual contract and project templates (see section C below). End users may be authorised to customise the storage location for individual contracts and projects (see section D below). The administrator may also further customise the entity management settings (see section E below).

10. Optionally, insert formats for the fallback – i.e. default – folder structures for contract entries, projects or the entity management.
Note: for contracts, there is an additional File folder structure field; for projects, there is an additional Contract folder structure field. These are accumulative. The Folder structure field defines the root for the contract or project entry, and by default all generated or uploaded files will be stored in the resultant path. However, in each case the second field may be used to further specify where any file should be stored, based on the document’s nature (e.g. draft, annex or signed document) or the individual contract within the project, respectively.
11. Click Save.
C. WEAGREE WIZARD – CONTRACTS AND PROJECTS
By default, all files in contract and project repositories are saved on Weagree. This must be changed after the SharePoint integration has been configured.
1. Navigate to Contract creation > Configuration.
2. From the File storage dropdown menu, select SharePoint file storage.
3. Click Save.

Optionally, you may at this point choose custom SharePoint sites and folder structures for each contract or project template. Doing so means that each file generated using such a template, or uploaded to a contract or project entry based on that template, will be stored elsewhere than the default location.
This override can be found in (the first subtab of) the contract and project template settings, accessible via the Template Creation Tool.
D. WEAGREE WIZARD – USER CUSTOMISATION
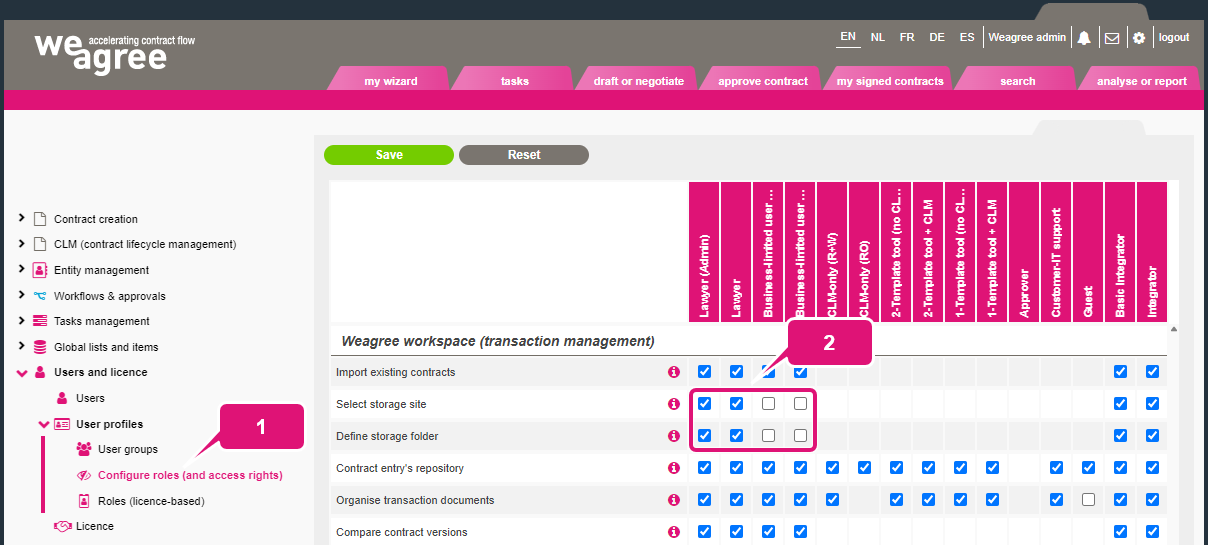
End users may be granted the right to select their own storage site and define a folder (structure) for the files associated with any individual contract or project via the Weagree Wizard’s user management.
1. Navigate to Users and licence > User profiles > Configure roles (and access rights).
2. Under the Weagree workspace (transaction management) category, enable or disable Select storage site and Define storage folder per user role. For more information on user roles and configuring access rights, click here and here.
3. Click Save.
E. WEAGREE WIZARD – ENTITY MANAGEMENT
By default, all files related to entities (and individuals) in the party database are saved on Weagree. This must be changed after the SharePoint integration has been configured.
1. Navigate to Entity management > Configuration.
2. From the File storage dropdown menu, select SharePoint file storage.
3. Click Save.

It is highly recommend, although not mandatory, to define different folders for the entity management’s various general document categories. Otherwise, all files for any given entity (or individual) will be collected in the same folder on SharePoint. For more information, see sections B through D of this tutorial.
